

How To Create Self Hosted Wordpress Blog
A step by step guide on how to set up a self-hosted WordPress blog
I'm showing you the 5 steps to set up your self hosted WordPress blog
Hi there. If you're reading this I can only guess that you're a newer blogger looking to set up your amazing blog using WordPress.org blogging software. If this is the case, you are definitely in the right place. In this post, I'll walk you through the 5 steps of setting up your blog:
STEP 1: PURCHASING HOSTING
STEP 2: REGISTERING YOUR DOMAIN
STEP 3: INSTALLING WORDPRESS.ORG
STEP 4: CHOOSING A THEME
STEP 5: START BLOGGING!
Sounds good? Leggo!
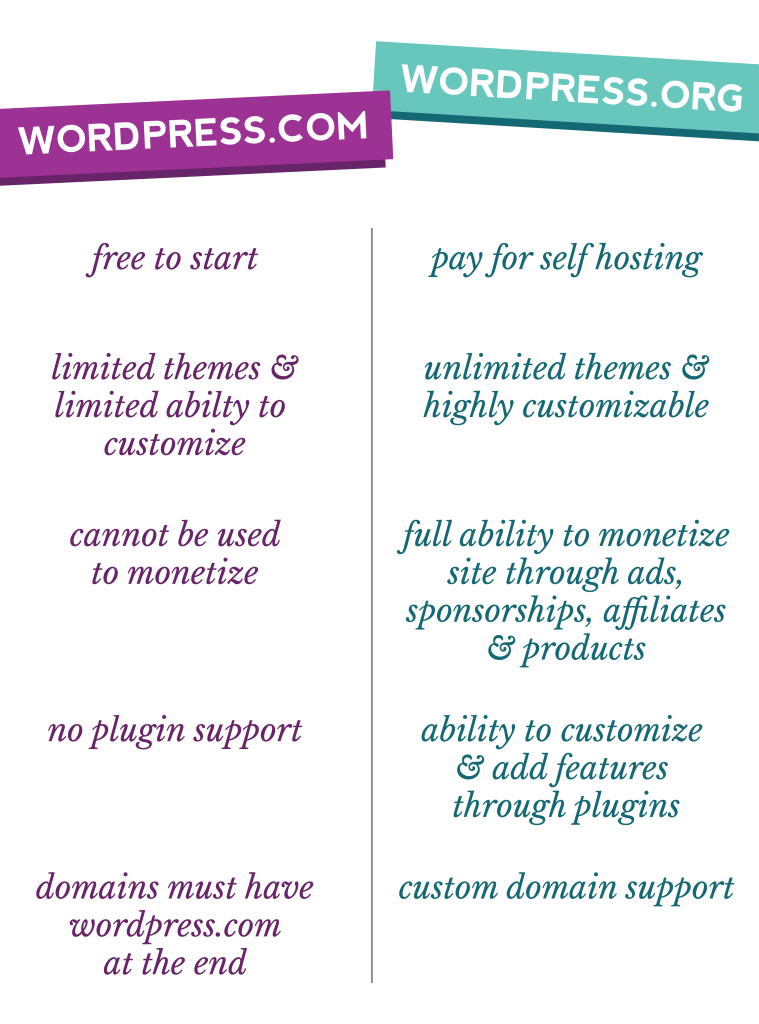
If you're slightly (or completely) confused about the difference between WordPress.ORG and WordPress.COM don't worry, you're definitely not alone. You can check out the graphic below for a brief overview, but I'll save you the pain and strife of making the decision and tell you right now: if you want to grow your blog in a meaningful way, WordPress.ORG is THE answer.
I started on WordPress.com and to be honest, I'm so mad I did. I wasted a ton of time having to convert my site so save yourself the stress and start with WordPress.ORG.
HOW TO SET UP A SELF-HOSTED BLOG ON WORDPRESS.ORG
STEP 1: PURCHASE WEB HOSTING
Web hosting is what your blog needs to get up and running. Think about it like this: your web host is pretty much your blog's landlord. You pay monthly (or annually) for your blog to live on the internet.
If you want to get nerdy, what you're actually paying for is space on your web host's servers aka massive computers whose job is to connect to the internet day in and out.
I highly recommend using Bluehost. I've been using Bluehost since 2013 and they're a fantastic company and web host. Their interface is easy to use and their customer service is truly exceptional. I've had a couple of blog-mergencies and they've calmly walked me through them (as I freaked out on the other line.)
For the first year, hosting costs 3.99/month and you can register your domain for free, which normally costs about $15 a year. I'd highly recommend keeping your domain and hosting in the same space. It makes life waaaay easier.
If you use this link: Bluehost Web Hosting I will get a small kickback (with no extra cost to you) but as I mentioned, it's what I use and I'd only recommend it to you if I was obsessed.
STEP 2: CHOOSE AND REGISTER YOUR DOMAIN NAME
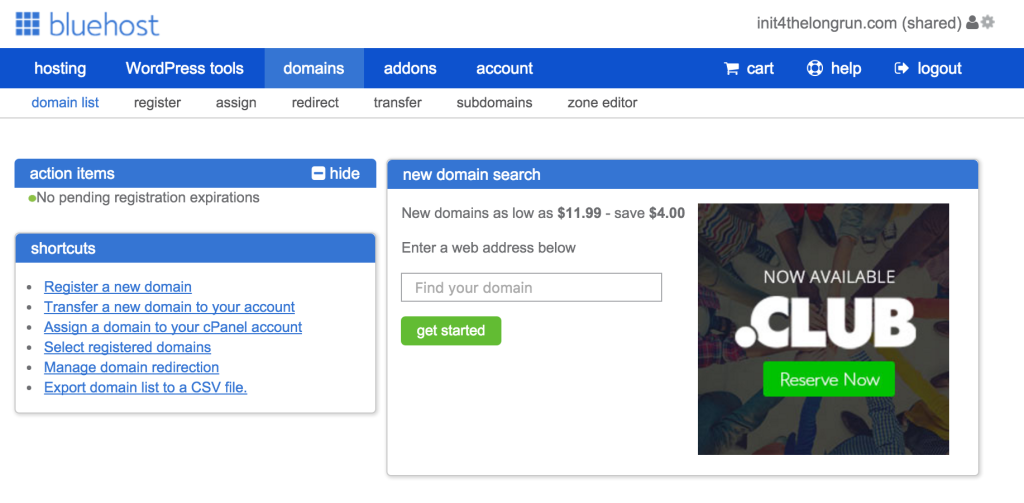
Once you purchase your Bluehost hosting account, you'll log in and be directed to your homepage. Your first step will be to register your domain name. Your domain name is the URL address for your website. For example, my domain name is georgiemorley.com.
To search and select your domain, you'll go to the top of the page and select the "domains" tab.
BRANDING TIPS FOR SELECTING YOUR BLOG'S NAME:
This might surprise you, but your name is a lot less important than you think. What really matters in branding is what you make of the name. Before Google was synonymous for "search" it meant nothing. It could have been called a million other things, but they chose Google. It became a household name because of the company, not because it was called Google. Your blog will be the same way.
What really matters when you're picking your URL is a few things:
DON'T MAKE IT TOO LONG
I think the sweet spot for a URL is 1-3 words. No one wants to type a novel into their URL bar, plus sharing links is a lot more cumbersome if you have a URL that's a mile long.
REGISTER A .COM URL
While the other URL's may be tempting or cheaper, stick with .com. Maybe in 10 years .pizza will be normal, but for now stick to industry standard.
DON'T DO LIKE I DID, AND USE A NUMBER IN THE URL
Learn from my mistake friends, my blog for a long time was init4thelongrun.com, which really was not ideal. Having a number in your URL makes it harder when I tell people my blog's name because they think I'm saying "for" not "4."
LOOK FOR A NAME THAT'S UNIQUE ENOUGH TO BE AVAILABLE ON THE MAIN SOCIAL PLATFORMS
Before you register your domain, see if your blog's name is available on Instagram and Twitter. Again big mistake when it came to In it 4 the Long Run, which was taken on both twitter and Instagram. Branding no-no's all around for this kid.
FINALLY, TRY TO MAKE IT UNIQUE
In the healthy living blog space there are tons of "Healthy Fit Runner Girls" out there, so choose something that stands out a little more, even if it seems quirky at first.
If you can't think of a good blog name, don't be afraid to use your own name in your blog. My friend Rachel Mansfield was a total genius and uses rachLmansfield as her blog/Instagram name. It's unique because it's her name and now everyone knows that Rachel is the blogger behind those accounts. Since first writing this post I've now converted my blog and social media to my name to make things easier search.
STEP 3: INSTALL WORDPRESS FOR YOUR WEBSITE
Alright, so you've got your hosting and domain name, now it's time to install WordPress. As we mentioned before, a self-hosted WordPress, while slightly more work and money upfront, will save you so much time and effort in the long run.
To install WordPress go to the homepage of the "hosting" tab in your Bluehost account.
Scroll down to the "website" section and click "Install WordPress"
You'll go to the next page and click the free install option.
Which will bring you to a new page where a drop-down menu will show your domain(s) available to install WordPress on.
You'll select the domain you just registered, click check domain.
Then, click the "advanced options" checkbox to choose your site's name, username and password for your login.
Then click "install now" and boom you've installed WordPress.
To login to your site's backend, you'll type in your URL plus /wp-admin and use the login info you just created to get access.
STEP 4: CHOOSE YOUR BLOG'S THEME
You've got your site, you've installed WordPress and now it's time to make your new blog your own! Choosing a theme is an exciting and fun decision. This is what controls how your blog looks to your readers. WordPress offers quite a few free themes but if we're being honest, purchasing a professional-looking theme for your site will make a world of difference. Again this is an example of learning from my mistakes, I had a free theme for about a year and it wasn't until I installed Foodie Pro that my site started looking professional and legit.
When I used to run a food blog I used Foodie Pro by Shay Bocks*. I wasn't alone either. It's been used by some of the biggest bloggers including Minimalist Baker. What makes it so fantastic is how versatile and customizable it is. She has tons of tutorials on how to set up the theme: here.
Foodie Pro* is what's known as a "Child Theme" for the Genesis Framework*, which is a type of paid theme that gives your site a ton of flexibility and features. Once you have the Genesis Framework*, you layer a "Child Theme" on top of it to control the visual appearance. Imagine it like a car: WordPress is your blog's engine, the Genesis Framework* is like your car's frame and the Child Theme is like your blog's paint job.
Again, honesty hour over here: it took me almost 6 months of debating whether or not I should invest in Genesis* and Foodie Pro* but next to my camera it's been the absolute best investment for my blog.
However, there are plenty of themes in the sea. We recommend checking out Studio Press and Creative Market for the best themes for food and healthy living bloggers.
STEP 5: BLOG YOUR HEART OUT
Boom. Ya did it. Now it's time to blog your heart out baby.

JOIN THE SQUAD
Get bonus podcast mini episodes, ramblings & reflections that aren't on the blog and lots of fun goodies in your inbox
Success! Now check your email to confirm your subscription.
How To Create Self Hosted Wordpress Blog
Source: https://georgiemorley.com/how-to-set-up-blog/
Posted by: poorewiced2001.blogspot.com
0 Response to "How To Create Self Hosted Wordpress Blog"
Post a Comment